Introduction
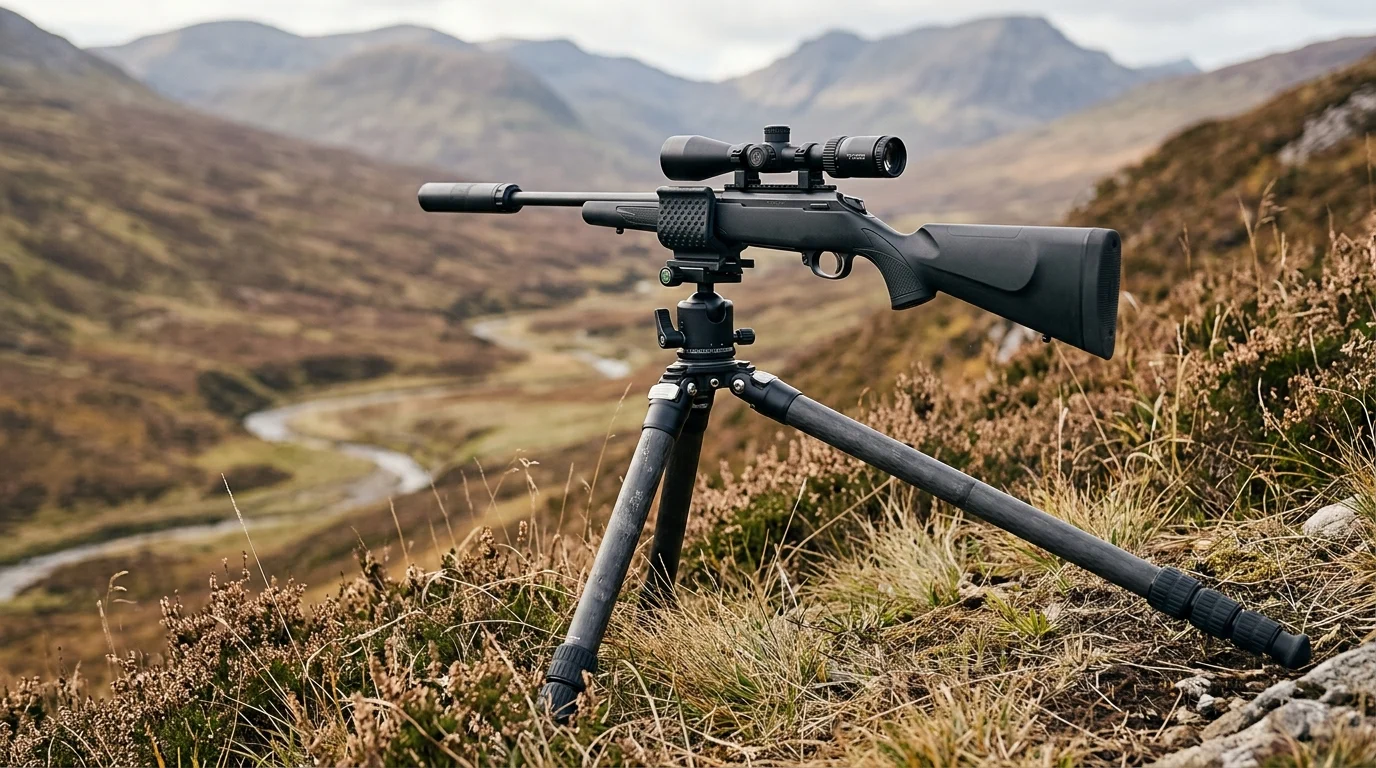
Choosing a hunting shooting tripod gun clamp saddle stick is really about balancing stability, speed, weight, and terrain compatibility. The right setup can turn a rushed, shaky opportunity into a controlled shot, especially when you are winded, shooting at distance, or working uneven ground. In this article, I break down the features that matter most when I evaluate one: clamp security, tripod strength, height range, packability, and how quickly the system deploys in real hunting conditions. By the end, you will have a practical framework for deciding which support style fits your rifle, your hunting style, and the kind of country you move through.
Why a hunting tripod gun clamp matters
If you spend enough time chasing game through rugged terrain, you quickly realize that finding the animal is only half the battle. The other half is actually making the shot when your lungs are burning, your adrenaline is spiking, and the wind is howling. I used to rely on backpacks, tree branches, or just my own shaky offhand stance to stabilize my rifle. Unsurprisingly, I missed shots I should have made. That all changed when I finally invested in a proper support system.
Today, I never head into the backcountry without a reliable setup. The difference between a clean, ethical harvest and a frustrating miss often comes down to how well you can anchor your weapon. Let me walk you through exactly why a dedicated support rig is an absolute game-changer, and the metrics I look at when evaluating my gear.
Role in stability and shot control
When shooting offhand, human error is the biggest variable. Your heart rate, breathing rhythm, and muscle fatigue all contribute to your rifle’s wobble zone. I’ve found that shooting unsupported with a standard 10-pound hunting rifle typically yields a wobble zone of about 3 to 4 MOA (Minute of Angle) for the average shooter. That means at 300 yards, your reticle is bouncing around within a 9 to 12-inch circle. That is simply too much margin for error on a vital zone.
By locking that same rifle into a high-quality hunting shooting tripod, I can instantly reduce that wobble zone to around 0.5 to 1 MOA. The tripod effectively transfers the entire weight of the weapon to the ground, removing arm fatigue from the equation entirely. You can lean into the setup, pre-load the tripod legs with a few pounds of forward pressure, and manage recoil much more effectively. When I can confidently spot my own impacts through the scope because the gun barely moved, I know I’ve got the right level of stability and shot control.
When hunting conditions change the setup
The reality of hunting is that the environment rarely gives you a flat, perfectly manicured shooting lane. I’ve had to take shots from steep, 45-degree scree slopes, waist-deep sagebrush, and cramped ground blinds. This is where the adaptability of a tripod system shines compared to a fixed-length bipod.
A good tripod clamp setup allows you to adjust from a prone height of around 6 inches all the way up to a standing height of 65 inches or more. When hunting conditions change rapidly—say, a buck steps out from behind a ridge but is obscured by tall grass—you can deploy the legs to a kneeling or standing position in seconds. Furthermore, having the rifle securely clamped means you can step back, keep the gun pointed in a safe direction downrange, and use your binoculars to glass without having to hold the rifle. It acts as an extra set of hands when the terrain gets complicated.
Key specifications to compare
Marketing brochures love to throw around buzzwords like “ultralight” and “tactical,” but when I’m trusting a piece of gear to hold a heavily customized rifle over rocks and mud, I ignore the fluff and look straight at the specifications. Understanding the numbers is how you separate the professional-grade tools from the cheap toys.
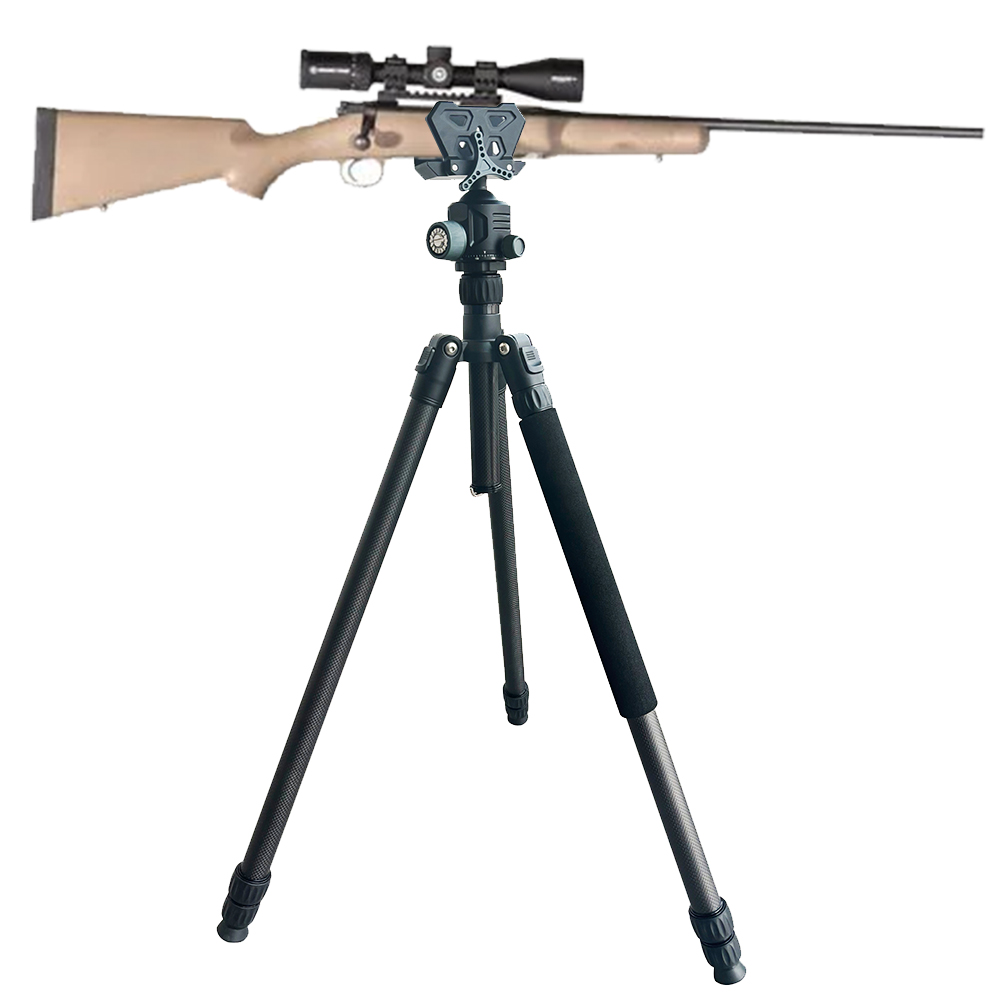
Load capacity, clamp range, and head style
The first number I check is the load capacity. A common mistake is buying a tripod rated for 15 pounds to hold a 12-pound rifle. You actually need a tripod rated for at least three to four times the weight of your gun. Why? Because when you lean into the rifle to manage recoil, you are adding significant dynamic weight. I personally look for a minimum load rating of 40 to 50 pounds.
Next is the clamp range. If you are using a saddle clamp, it needs to securely grip the forend of your stock. Most modern hunting rifles have forend widths ranging from 1.2 inches to 2.5 inches. I ensure the clamp’s jaws can open to at least 2.6 inches and close down tight enough to grip a slim sporter profile without bottoming out the threads.
Finally, the head style dictates your range of motion. Ball heads are my go-to because they allow for rapid leveling on uneven ground. I insist on a ball diameter of at least 44mm; anything smaller tends to slip under the weight of a heavy rifle when tilted at extreme angles.
Material, locking mechanism, and recoil control
Material choice dictates both your carrying weight and vibration dampening. Carbon fiber is my absolute preference. A high-quality carbon fiber tripod typically weighs between 3.5 and 4.5 pounds, saving you roughly 20% to 30% in weight compared to an aluminum equivalent, which usually tips the scales at 5.5 pounds or more. More importantly, carbon fiber dampens the micro-vibrations from wind and recoil much faster than aluminum.
For locking mechanisms, the industry has largely shifted toward the Arca-Swiss standard, which uses a 38mm dovetail rail. If your rifle has an Arca rail, you can bypass a bulky saddle clamp altogether and lock directly into the tripod head. This direct connection eliminates a failure point and reduces the setup weight by about 14 to 16 ounces. Regardless of whether you use an Arca lock or a saddle clamp, the locking mechanism must feature a positive, mechanical retention system so the gun doesn’t slide out under heavy recoil.
Using a simple comparison checklist
To make sense of these specs in the real world, I use a mental checklist to compare my options based on the specific hunt. Here is a breakdown of how different configurations stack up against each other.
| Setup Type | Typical Weight | Max Load Capacity | Best Attachment Style | Primary Advantage |
|---|---|---|---|---|
| Premium Carbon Fiber | 3.5 – 4.5 lbs | 50+ lbs | Direct Arca-Swiss (38mm) | Maximum stability and vibration dampening |
| Standard Aluminum | 5.5 – 7.0 lbs | 30 – 40 lbs | Saddle Clamp (1.2″-2.5″ range) | Cost-effective, rugged in rocky terrain |
| Hybrid Shooting Sticks | 1.5 – 2.5 lbs | 15 – 20 lbs | V-Yoke or Light Clamp | Extreme portability and speed |
By running through this simple comparison, I can instantly rule out gear that doesn’t meet the baseline requirements for my rifle’s weight and my expected hiking distance.
Tripod, clamp, saddle, and stick setups
I’ve experimented with almost every type of shooting support on the market. From heavy-duty tripods to minimalist sticks, each system has a specific use case. Figuring out which one to strap to my pack depends entirely on the style of hunting I’m doing that day.
When to use a tripod gun clamp
I reach for a full shooting tripod setup when precision is the absolute highest priority and I know I’ll have the time to deploy it. If I’m setting up on a canyon rim to glass for elk at distances exceeding 400 yards, the tripod is mandatory.
In these situations, the engagement window is usually longer—often extending past 60 seconds. I have the luxury of extending the legs, leveling the ball head, and dialing in my elevation turret. The tripod also serves double duty here; I can snap my spotting scope into the same head to glass, then swap to the rifle when it’s time to take the shot.
Matching setups to hunting scenarios
Not every hunt allows for a leisurely setup. If I’m hunting dense timber where shots are typically under 100 yards and happen in a flash, a bulky tripod is a liability. In these scenarios, I prefer a lightweight stick setup. You can deploy shooting sticks in under 3 seconds, which is crucial when a whitetail steps into a clearing and you only have a brief window.
For hunters who use traditional wooden or composite stocks without bottom accessory rails, a saddle clamp is the perfect bridge. It allows you to use a tripod without modifying your classic rifle. On the other hand, if I’m running a modern chassis rifle, I ditch the saddle entirely and use a direct Arca connection. It’s all about matching the hardware to both the environment and the firearm.
Speed, stability, and portability trade-offs
Every piece of gear involves a compromise between speed, stability, and portability. You simply cannot have a system that is ultralight, deploys instantly, and offers bench-rest stability. You have to pick the two traits that matter most for your hunt.
I often use a gun clamp saddle stick as a middle-ground solution. It offers better stability than a standard bipod but sets up faster than a heavy, multi-leg rig. Here is how I quantify the trade-offs when deciding what to pack:
| Support System | Setup Time | Stability Rating (1-10) | Packability / Weight | Ideal Scenario |
|---|---|---|---|---|
| Heavy Tripod + Arca | 15 – 20 seconds | 9.5 | Low (5+ lbs) | Long-range, stationary overwatch |
| Tripod + Saddle Clamp | 20 – 30 seconds | 8.5 | Low (6+ lbs) | Traditional stocks, blind hunting |
| Trigger-Style Sticks | 2 – 4 seconds | 5.0 | High (2 lbs) | Spot-and-stalk, dense brush |
| Monopod / Trekking Pole | 1 – 2 seconds | 3.5 | Extreme (< 1 lb) | Ultralight mountain hunting |
If I’m hiking more than five miles a day with massive elevation gain, I’ll sacrifice some stability to save three pounds. But if I’m walking a mile to a fixed blind, I’ll carry the heavy tripod every time.
Build quality and field durability
There is nothing worse than having your gear fail at the moment of truth. I once had a cheap aluminum tripod snap a leg locking lever in 15-degree weather right as I was setting up on a coyote. Since then, I’ve become incredibly uncompromising about build quality. Field durability isn’t just a nice-to-have; it’s a requirement.
Manufacturing and quality control checks
When I evaluate a new tripod or clamp, I look closely at the manufacturing tolerances. For twist-lock tripod legs, I want to see heavy-duty rubber O-rings that seal the internal threads against dust, grit, and moisture. A good set of legs should operate smoothly whether it’s -20°F or 120°F outside. I also check the leg section overlap. Inside the carbon fiber tubes, there should be a minimum of 1.5 inches of overlap between sections when fully extended. Less than that, and the leg becomes a lever that will eventually snap the carbon matrix under load.
For the clamp itself, I inspect the jaw pads. They need to be made of a dense, UV-resistant polyurethane or hard rubber—not cheap foam that will compress, rot, or peel off after a single season. The tension knobs should be oversized and deeply knurled so I can operate them easily while wearing thick winter gloves.
Parts, service support, and compatibility
Even the best gear can break if you take a bad spill down a rocky slope. That’s why I only buy from brands that offer robust service support and readily available replacement parts. I look for a minimum of a 5-year warranty, though lifetime warranties are becoming the standard for top-tier support systems. I also research defect rates; I want to see less than a 1% failure rate on hinge locks and ball head tensioners in user reviews.
Compatibility is another massive factor. I refuse to buy into proprietary ecosystems. Every tripod I own must feature a standard 3/8″-16 threaded stud on the apex, and smaller accessories should use the standard 1/4″-20 thread. This ensures that if my primary ball head seizes up, I can easily swap it out with a backup head from a completely different manufacturer. Standardization keeps you in the hunt when things go wrong.
How to make the final choice
Bringing all this information together can feel overwhelming, especially with the sheer volume of options on the market. However, I’ve developed a reliable system for cutting through the noise and finding the exact setup that fits my needs. It requires being honest with yourself about how and where you actually hunt.
Step-by-step selection process
My selection process always starts with the rifle. I weigh my fully loaded gun—including the optic, loaded magazine, suppressor, and sling. Let’s say it weighs 11.5 pounds. I immediately filter out any tripod with a load rating under 35 pounds to ensure I have that necessary 3x safety margin.
Next, I define my physical limits. If my typical hunt involves hiking distances greater than 5 miles, I set a strict weight ceiling of 3.5 pounds for the entire support system. This usually forces me into the premium carbon fiber category. If I hunt from a UTV or walk short distances to a blind, weight restrictions vanish, and I can look at heavier, more budget-friendly aluminum options.
Finally, I look at the attachment method. If my rifle has an Arca rail, I invest heavily in a top-tier ball head and skip the saddle clamp. If I’m shooting a classic walnut stock, I allocate a good portion of my budget toward a high-quality, CNC-machined aluminum saddle clamp with excellent tension control.
Final decision rules
Over the years, I’ve established a few hard-and-fast rules for my final purchase decisions. First, never compromise on the ball head. You can get away with slightly cheaper tripod legs, but a cheap ball head will creep, sag, and frustrate you endlessly. As I mentioned earlier, a 44mm ball diameter is my absolute minimum for a heavy precision rifle.
Second, I follow the “buy once, cry once” philosophy. A premium tripod system might cost as much as a mid-tier rifle scope, but it will outlast several rifles. I’d rather shoot a slightly cheaper optic off a rock-solid tripod than shoot a top-tier optic off a shaky, unreliable rest.
Ultimately, choosing the right support system transforms your confidence in the field. When you know your crosshairs will sit dead still on the target, regardless of the terrain or your fatigue level, you stop worrying about the mechanics of the shot and start focusing entirely on the hunt.
Key Takeaways
- The most important conclusions and rationale for hunting shooting tripod gun clamp saddle stick,
- Specs, compliance, and risk checks worth validating before you commit
- Practical next steps and caveats readers can apply immediately
Frequently Asked Questions
Why use a hunting shooting tripod gun clamp instead of shooting offhand?
A clamp tripod greatly cuts rifle wobble and fatigue, helping you make steadier, more ethical shots, especially at longer distances or in wind.
What load capacity should I look for in a hunting tripod saddle stick?
Choose a model rated at 3 to 4 times your rifle weight. For most hunting setups, a 40 to 50 lb rating is a safe target.
How wide should the gun clamp open for a hunting rifle?
Look for a clamp range that covers about 1.2 to 2.6 inches, so it can securely fit slim sporter stocks and wider forends.
Is a carbon fiber hunting tripod worth it for backcountry hunts?
Yes, if weight matters. Carbon fiber reduces carry fatigue while staying stiff enough for rifles, optics, and camera support in rough terrain.
Can the tripod on goodao.net hold optics or a camera too?
Yes. The featured multi-function carbon fiber tripod is designed for hunting gun support and can also hold optics or a camera for field use.
Post time: Jun-05-2026