How to choose a carbon fiber monopod for hunting and
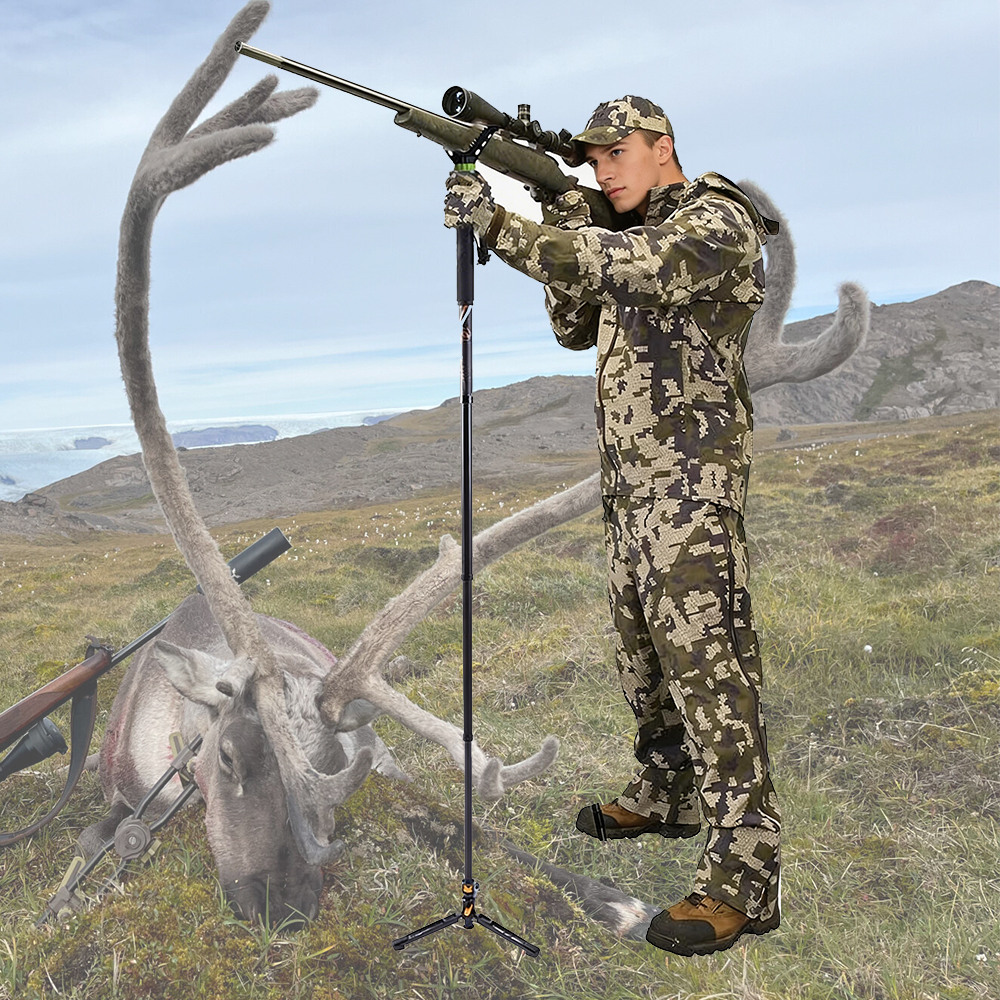
If you spend enough time chasing game through rugged terrain or competing in dynamic rifle matches, you quickly learn a harsh truth: gravity is relentless, and unstable shots miss. I’ve lugged heavy aluminum gear up mountainsides, only to regret every ounce, and I’ve tried shooting off flimsy branches that cost me the shot of a lifetime. That is exactly why I eventually transitioned to a dedicated carbon fiber tubes monopod. It is the ultimate cheat code for bridging the gap between mobility and rock-solid stability.
Choosing the right one isn’t just about grabbing the first lightweight stick you see online. The market is flooded with options ranging from cheap, splinter-prone poles to over-engineered tactical gear. To find the sweet spot, we need to look closely at how we actually use these tools in the field, what criteria dictate their performance, and the inevitable compromises we have to make when balancing weight against unyielding support.
Key use cases and performance needs
When I evaluate a monopod, I start by defining the exact use case. A spot-and-stalk hunter navigating dense brush in the Pacific Northwest has vastly different needs than a prairie dog shooter setting up over a sprawling Wyoming valley. If you are constantly on the move, you need a stick that doubles as a trekking pole and deploys in seconds. In this scenario, rapid-deployment features and a compact collapsed profile are non-negotiable.
Conversely, if you are shooting heavy precision rifles—often weighing upwards of 15 to 18 pounds—from a relatively static blind or a kneeling position, raw load-bearing capacity takes precedence over shedding a few ounces. I always tell folks to map out their typical engagement distances and carry distances. If you hike more than five miles a day, lean toward ultralight mobility. If your shots routinely stretch past 400 yards, prioritize a thicker, more rigid platform.
Main buying criteria
The main buying criteria always boil down to three pillars: weight-to-stiffness ratio, deployment mechanism, and interface compatibility. Carbon fiber is famous for its strength-to-weight ratio, but not all carbon is woven equally. I actively look for a monopod hunting shooting stick that offers multi-layer cross-woven carbon rather than cheap pultruded tubes, which can crack under lateral stress.
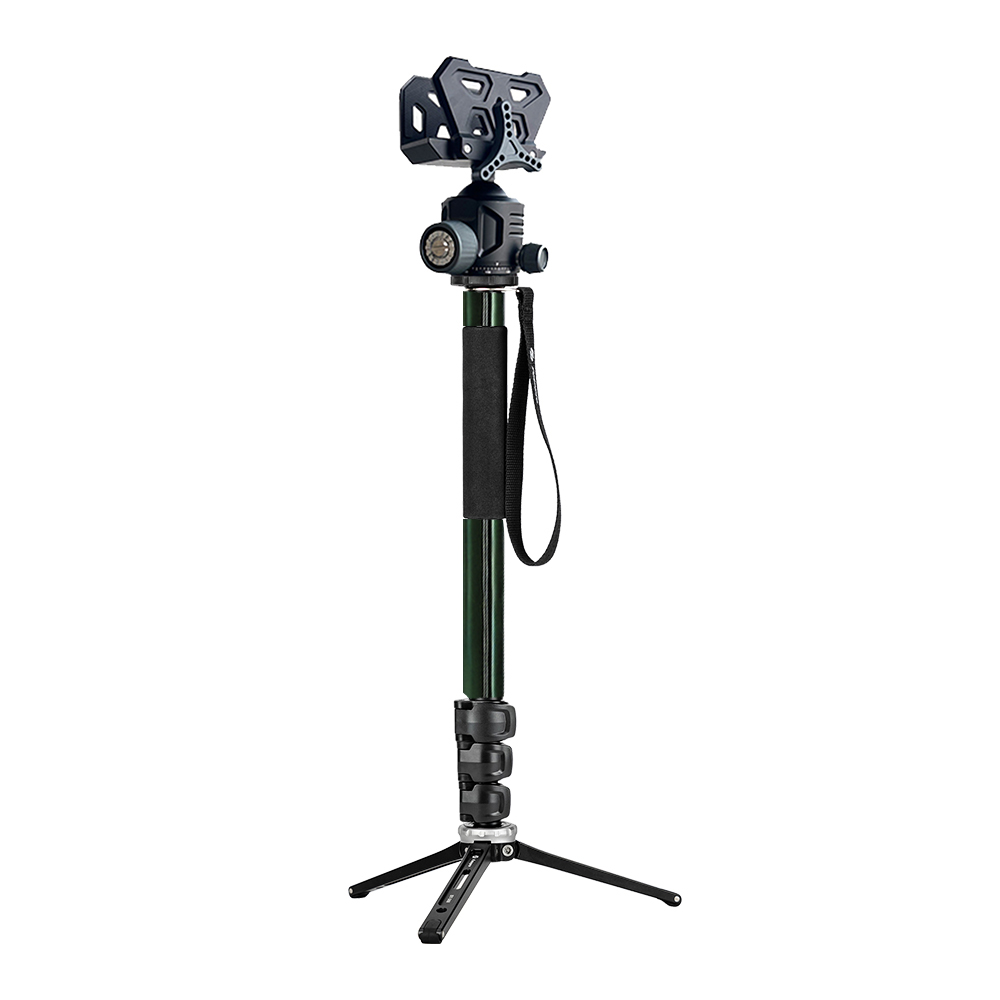
Beyond the material, pay close attention to the collapsed length. A monopod that collapses down to 20 inches or less is ideal because it easily straps to the side of a standard 30-liter daypack without snagging on low-hanging branches. Additionally, the top attachment point matters immensely. Whether you prefer a simple rubberized V-yoke for quick resting or an Arca-Swiss compatible ball head for clamping your rifle directly to the stick, the threading (usually 1/4″-20 or 3/8″-16) needs to be machined from stainless steel or high-grade aluminum, not cheap pot metal.
Common trade-offs
Let’s be honest about the trade-offs: you cannot have a monopod that is infinitely tall, virtually weightless, and capable of supporting a .50 BMG without flexing. The most common compromise I face is between leg section count and overall stability. A 5-section monopod packs down incredibly short, but every joint introduces a potential point of flex and adds the weight of an extra locking collar. A 3-section stick is inherently stiffer and lighter, but it might be too long to pack comfortably.
Cost is the other major trade-off. You can absolutely find a bargain-bin stick for under $30, but you are usually sacrificing the quality of the internal lock mechanism. I’ve had cheap twist locks fail and collapse under the weight of my rifle right as I exhaled to pull the trigger. Investing in high-quality carbon fiber and premium internal shims costs more upfront, but it guarantees the stick won’t betray you when the pressure is on.
What specifications matter most
Getting into the technical specifications is where you separate professional-grade gear from weekend-warrior toys. When I am sourcing or recommending a hunting shooting stick, I don’t just look at the marketing fluff; I want to see the hard numbers. The geometry of the tubes, the quality of the carbon layup, and the physical dimensions dictate exactly how the stick will perform in freezing rain or blistering heat.
Tube diameter, wall thickness, and layup
The heart of any carbon monopod is the tube itself. I always check the maximum tube diameter (the top section) and the minimum tube diameter (the bottom section). For a solid hunting application, I prefer a top tube diameter of at least 28mm to 32mm. If the bottom section drops below 16mm, it becomes too whippy for precision shots. Wall thickness is equally critical; a minimum of 1.2mm wall thickness is my baseline to ensure the tube won’t crush if you accidentally step on it or over-tighten a locking collar.
The “layup” refers to how the carbon fiber sheets are layered and cured. An 8-layer or 10-layer 100% carbon fiber construction with an alternating cross-weave provides exceptional torsional rigidity. Some lower-cost models blend fiberglass into the inner layers to save money, which drastically reduces stiffness and increases weight. I always verify that the spec sheet explicitly states “100% carbon fiber” rather than just “carbon composite.”
Height range, weight, and load capacity
Height range and weight capacity are the specs you will feel the most in the field. A good standing-height monopod needs to reach at least 65 inches to accommodate a tall shooter on uneven ground, but should compress enough to be used sitting or kneeling. Load capacity is often misunderstood. While a rifle might only weigh 10 pounds, the downward pressure you apply to stabilize it can easily exceed 30 pounds. I look for a minimum static load rating of 33 lbs (15 kg).
| Specification Category | Ultralight Stalker Profile | Heavy Duty Precision Profile |
|---|---|---|
| Max Tube Diameter | 24mm – 26mm | 32mm – 36mm |
| Wall Thickness | 1.0mm | 1.5mm |
| Load Capacity | 15 lbs (6.8 kg) | 45+ lbs (20.4 kg) |
| Bare Weight | Under 12 oz | 20 oz – 24 oz |
| Ideal Use Case | Backcountry hiking, light rifles | Static blinds, heavy magnum rifles |
As the table shows, pushing for higher load capacities naturally increases the bare weight of the stick. If I am running a lightweight mountain rifle, the Ultralight profile makes sense. But if I’m mounting a heavy spotting scope or a chassis rifle, the Heavy Duty profile is mandatory to eliminate micro-vibrations.
Feet, grip, and field features
The contact points of the monopod—the feet and the grip—often dictate its field usability. A standard rubber foot is fine for flat ground, but out in the wild, I need versatility. Look for sticks that offer interchangeable feet: a wide rubber base for hard rock or blind floors, and a stainless steel spike for biting into dirt, ice, and uneven hillsides. The spike should ideally be hidden under a retractable rubber boot for quick transitions.
Grip materials also matter more than you’d think. Dense EVA foam is the industry standard because it insulates your hand from freezing carbon tubes in winter and absorbs sweat in the summer. Silicone grips are more durable but can get slippery when wet. Finally, a robust wrist strap is a highly underrated feature. When properly tensioned against your wrist, a good strap effectively turns the single leg of the monopod into a more stable triangular tension support system with your arm.
How to assess build quality and supplier reliability
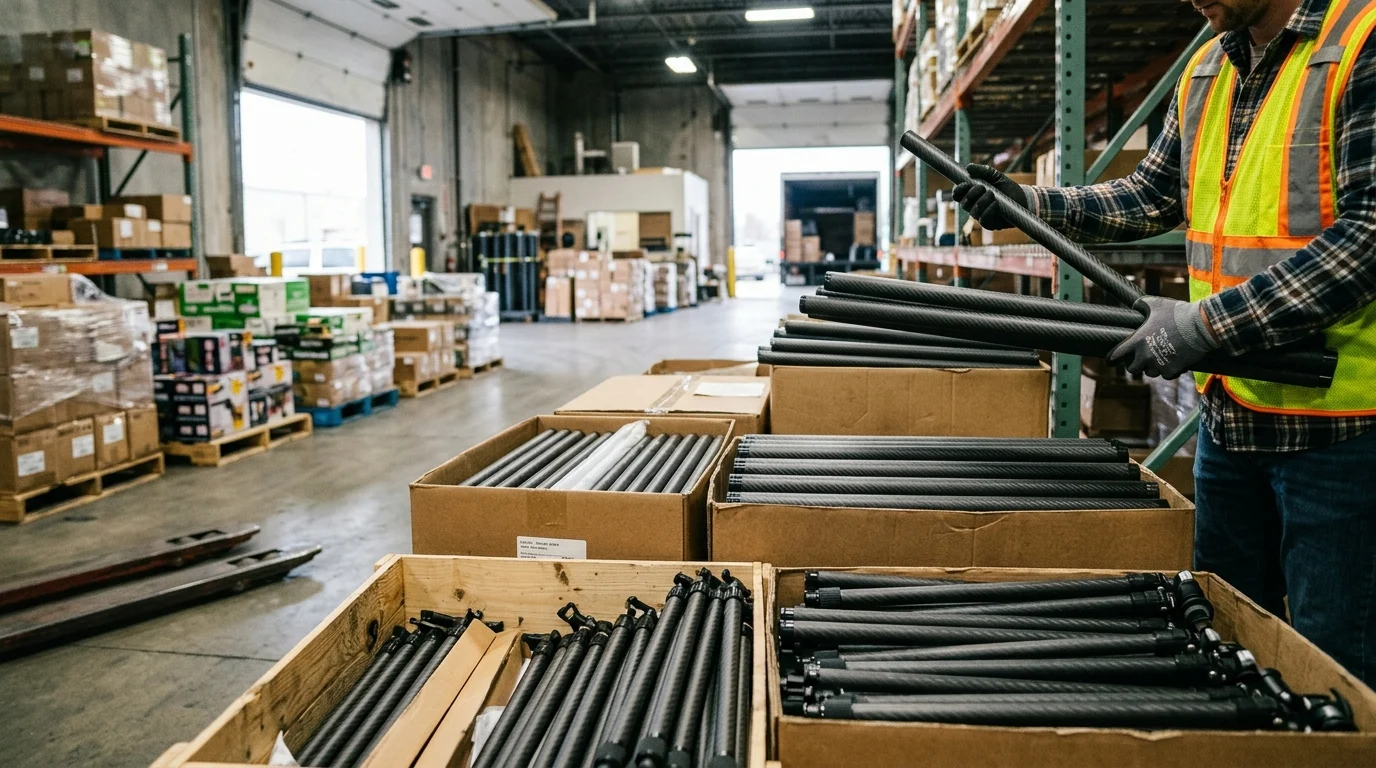
Whether you are a retail buyer looking to stock a new line of hunting accessories, or simply a discerning user who wants gear that won’t fail, assessing build quality is paramount. It is incredibly easy for a factory to make a monopod stick that looks great in photographs but falls apart after a week of hard use. I’ve learned the hard way that vetting the supplier and understanding their manufacturing standards is the only way to guarantee long-term reliability.
Manufacturing and quality control checks
When I dig into a supplier’s manufacturing process, the first thing I look for is their quality control (QC) protocol. Do they test the epoxy resin for UV resistance? Poor quality resin will turn a sickly yellow and become brittle after a few months of sun exposure. I also ask about their joint pull-testing. A high-quality carbon tube should withstand significant linear pull force without the glued aluminum threaded inserts breaking loose.
A reliable supplier will maintain a defect rate of under 1.5%. They achieve this through rigorous incoming material inspection and in-line assembly checks. One of the most common failure points is the internal anti-rotation shims inside the legs. If the factory uses cheap, brittle plastics instead of self-lubricating nylon or Delrin, the legs will eventually jam or spin freely. I always request details on the shim material before committing to a purchase.
OEM, ODM, and branded options
For buyers looking to source at scale, understanding the difference between OEM (Original Equipment Manufacturer) and ODM (Original Design Manufacturer) is crucial. If I want to launch a brand quickly, I’ll look at a factory’s ODM catalog. These are pre-engineered, off-the-shelf designs where I can simply add my logo and pick the grip colors. It is cost-effective and requires zero R&D.
However, if I want to introduce a proprietary locking mechanism or a unique leg profile, I have to go the OEM route. This means paying for custom molds. For aluminum and plastic injection parts on a monopod, mold fees typically range from $500 to $1,500 depending on complexity. While OEM requires a higher upfront investment and longer lead times, it is the only way to build a truly differentiated, branded product that stands out in a crowded market.
Compliance, labeling, and warranty
Compliance and warranty terms are the final indicators of supplier confidence. Even for something as simple as a shooting stick, environmental compliance matters. I ensure the rubber grips and plastic components meet REACH and RoHS standards, meaning they are free from toxic heavy metals and harmful phthalates. This is especially important if you are importing into the European Union or North American retail chains with strict chemical policies.
Labeling must be clear, including the origin of manufacture and specific load ratings. As for warranties, a supplier willing to stand behind their product will offer a minimum of a 1-year warranty against manufacturing defects, though top-tier manufacturers will push this to 3 or even 5 years. If a factory balks at a 1-year replacement guarantee for failed locking mechanisms or delaminating carbon, I immediately walk away.
How cost and logistics affect the buying decision
You can design the greatest carbon stick in the world, but if the economics don’t make sense, it will never reach the field. Cost and logistics are the invisible forces that dictate what products ultimately end up in our gear closets. Whether you are managing supply chains for a major outdoor retailer or running a niche private label, understanding how a shooting stick moves from the factory floor to the final consumer is critical for maintaining healthy margins.
Landed cost drivers
The landed cost of a monopod is driven by much more than just the raw carbon fiber. The FOB (Free On Board) unit cost for a high-quality, 10-layer carbon monopod usually sits between $25 and $60, depending on the complexity of the head and locking mechanisms. But shipping is where the hidden costs lie. Monopods are long, cylindrical items, which means they often “cube out” before they “weigh out” in a shipping container.
Volumetric weight is a major driver of logistics costs. If the packaging is unnecessarily bulky, you end up paying to ship empty air. I always work with suppliers to optimize the retail box dimensions. Choosing sea freight over air freight is mandatory for bulk orders to keep costs down, though sea freight adds 30 to 45 days to the supply chain timeline. Factoring in customs duties—which vary wildly depending on the country of origin and destination—is the final step in calculating true landed cost.
Channel fit for retail, wholesale, and private label
Matching the product to the right sales channel dictates how you handle inventory and packaging. For direct-to-consumer (DTC) private label brands, I prefer minimalist, eco-friendly corrugated packaging that survives the postal system without needing an outer master carton. This keeps fulfillment costs low. The MOQ (Minimum Order Quantity) for private label runs is typically 300 to 500 units per model.
If the goal is big-box retail or wholesale distribution, the product needs high-visibility clamshells or premium window boxes with peg-hole hangers. Retail packaging can add $1.50 to $3.00 to the unit cost, but it is essential for shelf appeal. Wholesale channels also demand tighter barcode compliance (UPC/EAN) and master cartons packed in specific quantities (usually 10 or 20 units per carton) to fit their automated warehousing systems.
Margin, return risk, and inventory balance
Balancing margins with return risk is the tightrope every brand walks. In the outdoor retail space, a healthy gross margin target is typically 50% to 60%. However, that margin can be rapidly eroded by high return rates. Through my experience, the number one reason consumers return monopods is a failing twist lock or a lever lock that loses tension. Spending an extra $2 at the factory level for premium lock internals can save $30 in reverse logistics and restocking fees down the line.
Inventory balance is the other side of the coin. Because hunting seasons are highly cyclical—peaking in the fall in North America—you cannot afford stockouts during Q3 and Q4. I recommend maintaining a safety stock equivalent to 20% of your forecasted peak-season demand. Ordering too late and being forced to use air freight to restock in October will completely wipe out the profit margin on those units.
How to shortlist and select the best option
We’ve covered the engineering, the economics, and the use cases. Now comes the fun part: making the final call. Shortlisting and selecting the best carbon fiber tubes monopod requires a methodical approach. I never rely on spec sheets alone; physical testing is the only way to know if a product truly performs under the harsh realities of the outdoors.
Shortlisting and sample testing
My shortlisting process always begins by requesting 3 to 5 samples from different suppliers or brands. Once they arrive, I put them through a series of practical stress tests. The first is the “lean test.” I fully extend the monopod, lock all the sections, and apply roughly 40 lbs of downward body weight. I’m looking for excessive bowing in the lower tube sections and listening for any creaking or slipping in the locks.
Next, I test the environmental resilience. I will literally leave the samples in a chest freezer overnight at 0°F (-18°C), then take them out and try to operate the locking mechanisms with thick winter gloves. Cheap plastics will freeze and crack, or the grease inside the threads will turn to glue. A high-quality stick will deploy smoothly regardless of the temperature drop.
Comparison framework
To keep my evaluations objective, I use a comparison framework that scores the samples across key operational metrics. The locking mechanism is usually the deciding factor, as it dictates how the stick handles in the field.
| Lock Type | Speed to Deploy | Weather Resilience | Maintenance Requirement | Field Adjustability |
|---|---|---|---|---|
| Twist Lock | Moderate | Excellent (Sealed) | Low | Infinite / Silent |
| Lever / Flip Lock | Fast | Good | Moderate (Needs tensioning) | Fixed increments, can snap loud |
| Trigger Pull (Internal) | Very Fast | Fair (Prone to freezing) | High | Instant, one-handed |
As the framework shows, trigger-pull systems are incredibly fast for one-handed adjustments, making them popular for dynamic hunting. However, their complex internals make them susceptible to freezing and jamming with dirt. For rugged, backcountry reliability where I might be miles from help, I almost always score the sealed twist-lock systems highest, despite them taking a fraction of a second longer to deploy.
Final decision checklist
Before issuing a final Purchase Order or adding a stick to my permanent gear roster, I run through a final decision checklist. First, does the physical sample perfectly match the agreed-upon spec sheet? I measure the tubes with digital calipers and weigh the unit on a gram scale to verify. Second, are the lead times realistic? A standard production run should take 30 to 45 days; anything longer ties up capital unnecessarily.
Finally, I confirm the spare parts policy. Good suppliers will provide a small percentage (usually 1-2%) of spare rubber feet, lock collars, and grips with the bulk order. Once the specs are verified, the sample passes the freeze/stress tests, and the logistics timeline aligns with the hunting season calendar, I know I’ve found a monopod that will deliver dead-center stability when it matters most.
Key Takeaways
- The most important conclusions and rationale for Carbon fiber tubes monopod hunting shooting stick
- Specs, compliance, and risk checks worth validating before you commit
- Practical next steps and caveats readers can apply immediately
Frequently Asked Questions
What tube material should I choose for a hunting shooting monopod?
Choose multi-layer cross-woven carbon fiber tubes. They offer better stiffness, lower weight, and improved resistance to lateral cracking than cheap pultruded tubes.
How short should a carbon fiber monopod collapse for pack carry?
Aim for 20 inches or less. That size typically straps cleanly to a daypack and reduces snagging in brush.
Is a 3-section or 5-section monopod better for hunting?
A 3-section model is usually stiffer and lighter. A 5-section model packs shorter, but added joints can increase flex.
What top attachment works best on a monopod hunting shooting stick?
Use a rubber V-yoke for fast field shots, or an Arca-compatible head for more secure rifle support. Check for 1/4-20 or 3/8-16 threads.
How do I choose the right monopod for long hikes versus long shots?
For hikes over five miles, prioritize ultralight weight and quick deployment. For shots past 400 yards, choose thicker tubes and higher load capacity.
Post time: Jun-05-2026